Howto install Ubuntu 11.10 to LVM/LUKS system
without Ubuntu Alternate installer
Benefits: Desktop liveCD (possibly in a pen drive) is more useful after the installation than Alternate CD.
In short
- Create LVM and LUKS system
- Boot LiveCD system
- Install lvm2
- Make sure LVs are visible in /dev/mapper
- Install with manual partitioning. Do not reboot!
- Chroot and install missing packages to the new system
- Profit
Item 1 can be done also after item 3 in which case 4 is true automatically. Do this if you don't have a working Linux system available, where you can access the target disk.
Procedure
This is how I installed a new system drive into my laptop. I already had LVM with LUKS in the old system and wanted just to replicate the old system. I had an eSATA port so I was able to attach the new drive to a working system and conveniently prepare the new disk. This is not necessary, as you can just replace the system drive, boot from the installation medium, and prepare the disk from the LiveCD environment.
My personal home directory is a full separate LV-partition, which is LUKS encrypted and mounted at login. Below are some notes how to achieve this. To follow the steps requires you to understand how to use the command line and install packages.
Why not just dd the partitions to the new disk? Because the old system has bad blocks.
LVM and LUKS
Partitioning
If you have a Linux system running, you may prepare the new disk in it. If not, boot the liveCD system and follow the above numbered steps in the order 2, 3, 1, 4-7.
Attach the new disk to the computer. Since I hotplugged the new disk via eSATA and I am in a disk group, wouldn't need root permission. However, syncing disks at the end requires root power, so use it anyway.
Use your favorite tools to partition the new disk as you wish. Keep a partition for /boot out of the LVM system. Therefore, create a small 133M Id 83 (Linux) partition and one or more Id 8e (Linux LVM) partitions. Create several partitions, if you wish to keep an option to later remove some of them from the Linux use.
At this point the new disk is /dev/sdb
sudo fdisk /dev/sdb
[...]
The result will be something like
$ fdisk -l /dev/sdb

Disk /dev/sdb: 128.0 GB, 128035676160 bytes
255 heads, 63 sectors/track, 15566 cylinders, total 250069680 sectors
Units = sectors of 1 * 512 = 512 bytes
Sector size (logical/physical): 512 bytes / 512 bytes
I/O size (minimum/optimal): 512 bytes / 512 bytes
Disk identifier: 0xga666a66

Device Boot      Start         End      Blocks   Id  System
/dev/sdb1   *        2048      274431      136192   83  Linux
/dev/sdb2          274432    84160511    41943040   8e  Linux LVM
/dev/sdb3        84160512   168046591    41943040   8e  Linux LVM
/dev/sdb4       168046592   250069679    41011544    5  Extended
/dev/sdb5       168048640   209991679    20971520   8e  Linux LVM
/dev/sdb6       209993728   250069679    20037976   8e  Linux LVM
Create LVM system
Now we can create the LVM system and actual logical volumes. LVM allows you to resize your logical volumes (LV) easily afterwards. For all practical purposes you may think LVs as "partitions".
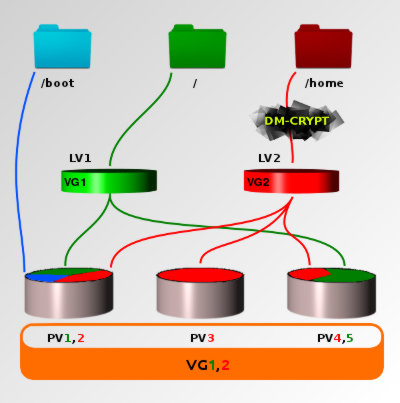
Fig. 1 An example LVM configuration. VG1 = PV1 + PV5, VG2 = PV2 + PV3 + PV4. In this example, both VG1 and VG2 contain only one LV each. However, each VG could be divided to several LVs. The disk partition mounted at /boot is not part of VG1 or VG2.
1. Choose which physical partitions will be available for LVM
I left /dev/sdb6 as a spare part(ition).$ sudo pvcreate /dev/sdb2 /dev/sdb3 /dev/sdb5 Physical volume "/dev/sdb2" successfully created Physical volume "/dev/sdb3" successfully created Physical volume "/dev/sdb5" successfully created
2. Create Volume Group
Use the above dedicated partitions to create the new volume group. Let's call the VG as tarha:
$ sudo vgcreate tarha /dev/sdb2 /dev/sdb3 /dev/sdb5
Volume group "tarha" successfully created
I use the default size of an extent (4Mb) which is fine for most uses.
3. Create Logical Volumes
Next, create the logical volumes, which will show up as partitions. Unlike partitions, their size and other attributes can be later modified according to your needs.
$ sudo lvcreate --name root --size 15G tarha
Logical volume "root" created
I also created
--name tmp --size 1G
--name myuser --size 40G
--name storage --size 40G
--name home --size 4G
--name swap --size 2G
Note how the to-be home volume is only 4G, as I will mount the encrypted myuser volume at /home/myuser at login. You can see all LVs by commanding
$ sudo lvdisplay tarhaNow the partitions are real and you can see them in the /dev/tarha/ and /dev/mapper/ directories. Now you could create file systems for them or do that during the installation. For example:
sudo mkswap /dev/tarha/swap
sudo mkfs.ext2 /dev/mapper/tarha-tmp
sudo mkfs.ext3 /dev/mapper/tarha-root
Encrypt the home directory for the user 'myuser'
Let's prepare the encrypted device now. Use the same password as you use at login. Note: if you use a weak password, the encryption is worthless since your password is easier to crack than the encryption.$ sudo cryptsetup -c aes-cbc-essiv:sha256 -y -s 256 luksFormat /dev/tarha/myuser WARNING! ======== This will overwrite data on /dev/tarha/myuser irrevocably. Are you sure? (Type uppercase yes): YES Enter LUKS passphrase: Verify passphrase: Command successful.Now test it: Create a mapping (just temporarily)
sudo cryptsetup luksOpen /dev/tarha/myuser jariEncrypted device is now open and is visible in /dev/mapper/jari. Create a filesystem there.
mkfs.ext4 -j -m 1 -O dir_index,filetype,sparse_super /dev/mapper/jariNow it can be mounted. This situation corresponds to Fig. 1, where LV2 (/dev/tarha/myuser) goes through dm-crypt with LUKS (becomes /dev/mapper/jari) and is mounted at /home. At this point I copied my old files there
sudo rsync -axS /home/myuser/. /path/to/mounted/jari/.Check the copy
diff -rq /home/myuser /path/to/mounted/jariThe crypted device can be umounted and locked
sudo umount /path/to/mounted/jari
sudo cryptsetup luksClose jari
Install
Shut down the computer and physically install the newly partitioned disk to the computer. Boot the liveCD eg. from a usb stick.
Install lvm2 package. This needs watershed as a dependency. If you do not have an Internet connection at this point, copy the packages to your installation medium in advance. Make sure that the volume groups are available:
sudo vgchange -a y
They should be visible in /dev/mapper/ again. Start installation program and use manual partitioning. (Note: The Kubuntu ubiquity installer crashed several times for me at the manual partitioning page. I suspect this was due to one mounted usb-stick partition. After I umounted it, the installer did not crash anymore.)
After the installation finishes, do not reboot! The system cannot boot because the desktop system does not have lvm installed. Therefore it cannot access the volumes.
Mount the newly installed target system:sudo mount /dev/mapper/tarha-root /mnt sudo chroot /mnt mount /proc sudo mount --bind /dev /mnt/dev sudo chroot /mnt mount /bootNow install the missing packages to the new system:
sudo chroot /mnt apt-get install cryptsetup lvm2 dmsetup
sudo umount /mnt/proc /mnt/dev /mnt/boot /mnt
Now the system is functional. However, since we want to mount one user home directory at login, we'll setup it now.
Note: Because the myuser home is not mounted at boot, it will never be fsck'ed. Therefore it must be checked manually (filesystem unmounted but volume unlocked).
Mount home directory automatically
PAM will take care of the automatic mounting. Install it to the NEW system:sudo chroot /mnt aptitude install libpam-mount
Make sure that /mnt/etc/fstab does not contain any mount instruction for the encrypted partition. That should not be there, unless you messed the partition assignments during the installation.
Edit the new crypttab:
$ cat /mnt/etc/crypttab
myuser  /dev/tarha/myuser  noauto  luks
and add to the end of /etc/security/pam_mount.conf.xml a line:
<volume user="myuser" fstype="crypt" path="/dev/tarha/myuser" mountpoint="/home/myuser"/>before the </pam_mount> tag.
Boot the system.
lvmeject
I have written a tool which can be used to eject LVM governed external hard drives.
It enables unmounting filesystems from a given logical volume group, and subsequently, locking the opened LUKS-controlled crypted logical volumes or physical devices and then removing the volume group from kernel. In addition, the physical disk can be shut down for physical removal.
The utility may become handy if you have an external hard drive which has LVM controlled partitions, some of which may be LUKS controlled.
The project page is on launchpad, and ubuntu packages can be downloaded from my launchpad repository.
